
D365FO Integration: Event-Based Exports to External Web Services
October 07, 2024
In this blog post, I will describe how to implement event-based data export from Dynamics 365 Finance to the Web service using REST API call.
While a simplified example illustrates the core concepts, the approach and code samples are rooted in real-world integration scenarios, making them easily adaptable for similar tasks. We'll leverage a free and open-source External integration framework, offering reusable components for building robust integrations.
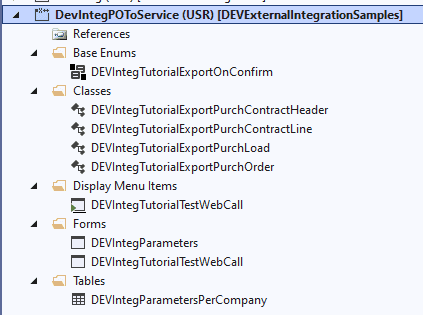
Modification description
Let's begin with our task sample definition:
Goal: Design and develop a Dynamics 365 Finance integration solution that automatically sends confirmed purchase orders from D365FO to a partner website via REST API endpoint.
To illustrate this process, I utilized Claude Sonnet 3.5 to generate a simple Purchase Order Management application and deploy it to Azure.
The source code is available on GitHub. The application comprises two main components:
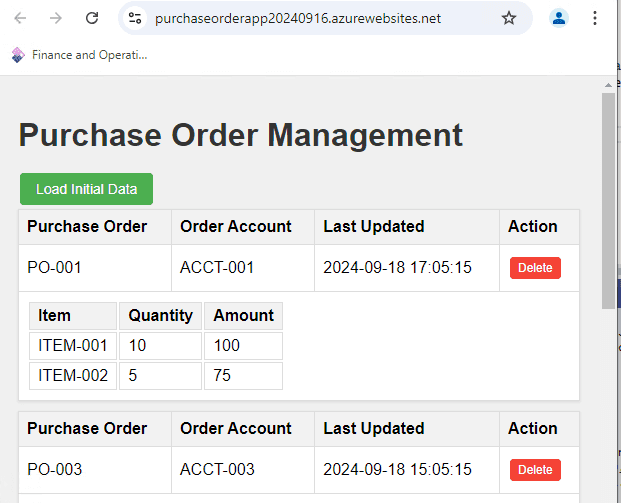
- A frontend for displaying orders:
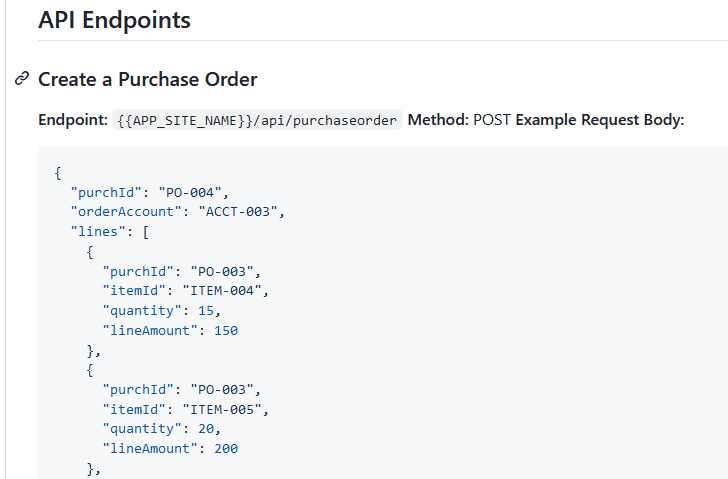
- A backend that includes an API for accepting these orders:
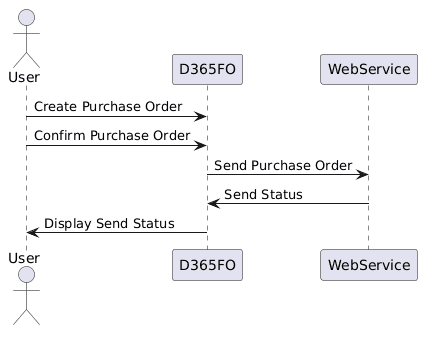
In our scenario, we will send confirmed Purchase Orders (POs) from D365FO to this API. The UML diagram below illustrates our test process:
Planning and Scoping Integration Project
To initiate an integration project like this, I recommend organizing a kickoff meeting with key stakeholders from both the D365FO team and the Web Service provider (third-party team). During this meeting, address the following aspects:
1. Create a Data Mapping document
Discuss and document what data needs to be sent and how it should be mapped to the third-party system's accepted format. This is a fundamental question for the entire integration and often requires significant time and attention.
A template for this document can be found here.
In our example, to simplify the process, we're sending all confirmed purchase orders for vendors from a specified Vendor group without any complex mapping.
2. Reference Data Management
Data exchange often involves 'reference data' such as Item codes or Vendor IDs. Aligning how both systems manage this data is crucial. Let's explore some common scenarios:
-
a) Limited data acceptance: The Web service may accept only a predefined set of data. In this case, you might need to create additional tables in D365FO to maintain possible options.
-
b) Stable, manually loaded data: When reference data is relatively static, manual updates might suffice. For instance, a user could periodically(e.g. monthly) upload an updated item list to the external system
-
c) Frequently changing data: If reference data changes often, you may need to develop a separate integration process to keep it synchronized.
-
d) Automatic reference data creation: Some web services can automatically create reference data entries based on the incoming message. In this scenario, ensure all required fields (e.g., Item name, Vendor name) are included in the transmission.
3. Error Handling Rules
Establish clear protocols for error handling. Consider these common approaches:
a) Real-time validation: All business logic validations occur during the API call. A successful call indicates the document has been accepted. This is generally the preferred method.
b) Format-only validation: The Web service only checks the message format during the call. If the format is correct, the message is accepted for further processing.
Option (a) requires designating a D365FO team member to respond to integration errors. Ensure this person has a documented support channel with the Web Service support team. For example, how will the returned message "Item AAA can't be purchased" be processed?
Option (b) is more straightforward from the D365FO side, but it creates some challenges. You need to know the document's current status. This may be implemented as another integration(inbound to D365FO).
4. Data Structure and Cardinality
Address potential differences in data structure between systems. For example:
- D365FO might allow multiple lines with the same ItemID in a Purchase Order, while the receiving system may not support this.
Identify these discrepancies early to plan appropriate handling mechanisms.
5. Handling Document Updates
Define how modified documents should be handled. For instance:
- In our case, multiple confirmations can be made for one purchase order. The Web service should be capable of accepting and processing updated versions of previously sent documents.
6. API Flexibility
Understand the web service provider's constraints regarding API modifications. Possible scenarios include:
a) Fixed public API: The API is used by multiple clients and cannot be modified. b) Flexible API: The third-party team can allocate resources to adjust the API for this integration.
If option (b) is possible, establish clear communication channels, developer availability, and bug tracking procedures.
7. Batch vs. Real-time Integration
Decide whether document export should occur:
a) Via a batch job (introducing a delay of at least a few minutes), or b) Immediately after a triggering action (real-time).
This blog post will focus on implementing the more complex real-time integration scenario.
Implementing the Export Functionality
Key Components of the Export Class
The External integration framework provides a base class for implementing event-based integration. To provide an example, I created DEVIntegTutorialExportPurchOrder class that extends this base class. Let's examine it's key methods and components:
1. Validation Method: isNeedToCreateLog
This method defines the rules for determining whether a record should be exported. In our purchase order scenario, it checks if:
- The purchase order is in a Confirmed state.
- The vendor belongs to the specified Vendor Group
- Other relevant conditions are met.
boolean isNeedToCreateLog(PurchTable  _purchTable)
{
    boolean                             res;
    DEVIntegParametersPerCompany        integParametersPerCompany = DEVIntegParametersPerCompany::find();
    ;
    if (this.isMessageTypeEnabled() &&
        _purchTable.DocumentState == VersioningDocumentState::Confirmed  &&
        _purchTable.PurchaseType == PurchaseType::Purch &&
        integParametersPerCompany.POExportOnConfirm != DEVIntegTutorialExportOnConfirm::None &&
        _purchTable.vendTable_OrderAccount().VendGroup == integParametersPerCompany.VendGroupId
        )
    {
        res = true;
        if (DEVIntegExportDocumentLog::sentRecordExists(_purchTable, messageTypeTableOutbound.ClassName))  //already marked to send
        {
            res = false;
        }
    }
    return res;
}
2. Bulk Export Method: exportAllData
This method is used for two scenarios: a) Initial data load when starting the integration b) Re-exporting data after making changes to the export logic/contract
It allows users to specify which records to export through a query dialog.
public void exportAllData()
{
    Query                   query = new Query();
    QueryBuildDataSource    qBDS;
    PurchTable              purchTable;
    int                     processedCounter, insertCounter;

    qBDS = query.addDataSource(tableNum(PurchTable));
    qBDS.addRange(fieldNum(PurchTable, DocumentState)).value(SysQuery::value(VersioningDocumentState::Confirmed));
    qBDS = qBDS.addDataSource(tableNum(VendTable));
    qBDS.joinMode(JoinMode::InnerJoin);
    qBDS.relations(false);
    qBDS.addLink(fieldnum(PurchTable, OrderAccount), fieldNum(VendTable, AccountNum));
    qBDS.addRange(fieldNum(VendTable, VendGroup)).value(SysQuery::value(DEVIntegParametersPerCompany::find().VendGroupId));

    QueryRun     queryRun;
    queryRun = new QueryRun(query);
    if (queryRun.prompt())
    {
        while (queryRun.next())
        {
            purchTable = queryRun.get(tableNum(PurchTable));
            if (this.insertFromPurchTable(purchTable))
            {
                insertCounter++;
            }
            processedCounter++;
        }
        info(strfmt("%1 record(s) processed, %2 marked to export", processedCounter, insertCounter));
    }
}
public boolean insertFromPurchTable(PurchTable  _purchTable)
{
    boolean  res;
    ;
    if(this.isNeedToCreateLog(_purchTable))
    {
        this.createLogFromCommon(_purchTable, _purchTable.PurchId);
        res = true;
    }
    return res;
}
3. Core Export Method: exportWebMessage
This method implements the actual export call to the web service. It handles:
- Preparing the data for export
- Making the API call using an HttpClient. As we used a custom service, we also need to define a new load class DEVIntegTutorialExportPurchLoad that implements communication with the service, but In case we integrate using Azure file share or Azure service bus, the External integration framework already has base load classes for this
- Processing the response, in our case, getting the number from an external Web Order and linking it to our PO.
public void exportWebMessage(DEVIntegExportDocumentLog    _exportDocumentLog, DEVIntegMessagesLoadBaseType     _loadFileStorageCache)
{
    PurchTable purchTable = PurchTable::findRecId(_exportDocumentLog.RefRecId);
    DEVIntegTutorialExportPurchLoad  exportPurchLoad = _loadFileStorageCache as DEVIntegTutorialExportPurchLoad;
    exportPurchLoad.initConnection();
    DEVIntegTutorialExportPurchContractHeader  contractData = new DEVIntegTutorialExportPurchContractHeader();
    contractData.initFromPurchOrder(purchTable);

    str sJSON = FormJSONSerializer::serializeClass(contractData);
    Num  externalId = exportPurchLoad.postContract(sJSON, _exportDocumentLog.DocumentId);

    ttsbegin;
    purchTable = PurchTable::findRecId(_exportDocumentLog.RefRecId, true);
    purchTable.VendorRef   = externalId;
    purchTable.doupdate();
    ttscommit;
}
4. Data Contract Classes
To structure the JSON data for export, we use data contract classes. In our case, we have:
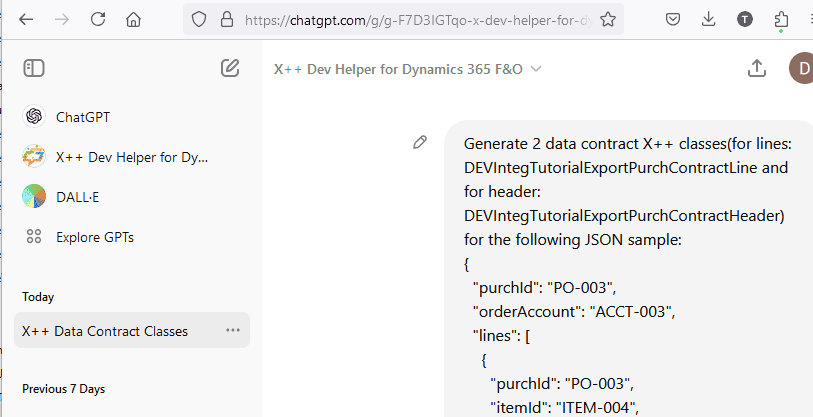
What I found is that the "X++ Dev Helper for Dynamics 365 F&O" custom GPT for ChatGPT is quite good at creating these classes based on just the sample JSON.
5. Event Handlers for Export Triggers
These methods mark records for export when certain events occur, such as confirming a purchase order. They should:
- Execute within the posting transaction
- Update or insert a reference in the DEVIntegExportDocumentLog table with Export status to "To send"
[DataEventHandler(tableStr(PurchTable), DataEventType::Updated)]
public static void PurchTable_onUpdated(Common sender, DataEventArgs e)
{
    PurchTable purchTable = sender as PurchTable;
    if (purchTable.DocumentState == VersioningDocumentState::Confirmed  &&
        purchTable.orig().DocumentState != purchTable.DocumentState )
    {
        DEVIntegTutorialExportPurchOrder  exportMessage = DEVIntegTutorialExportPurchOrder::construct();
        exportMessage.insertFromPurchTable(purchTable);
    }
}
6. Post-Operation Export Methods
These methods run after the main operation (e.g., purchase order confirmation) to initiate the actual export process. They:
- Execute outside the main transaction, so any failure in export should not block the document posting
- Check for records marked for export
- Trigger the export process for those records
The export sequence is presented on the following diagram:
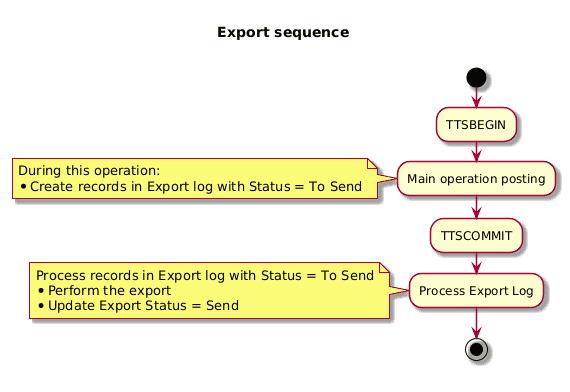
In our case, we want to check at the end of Purch confirmation whether any export records have been created and, if so, run an export operation for these records.
[PostHandlerFor(classStr(FormletterService), methodStr(FormletterService, postPurchaseOrderConfirmation))]
public static void FormletterService_Post_postPurchaseOrderConfirmation(XppPrePostArgs args)
{
    if (DEVIntegParametersPerCompany::find().POExportOnConfirm != DEVIntegTutorialExportOnConfirm::OnConfirm)
    {
        return;
    }

    PurchFormLetterPurchOrderContract contract = args.getArg('_contract') as PurchFormLetterPurchOrderContract;
    if (contract)
    {
        PurchParmUpdate purchParmUpdate = contract.parmParmUpdate();
        PurchParmTable  purchParmTable;
        PurchTable      purchTable;
        DEVIntegExportDocumentLog  integExportDocumentLog;
        ClassName       exportClass = classStr(DEVIntegTutorialExportPurchOrder);
        DEVIntegExportRecordList  exportRecordList;

        //or if one record - DEVIntegExportRecordList::constructFromRecord()
        while select ParmId from purchParmTable
            where purchParmTable.ParmId == purchParmUpdate.ParmId
        join PurchId from purchTable
            where purchTable.PurchId        == purchParmTable.PurchId
        join integExportDocumentLog
            where integExportDocumentLog.RefTableId == purchTable.TableId
                && integExportDocumentLog.RefRecId == purchTable.RecId
                && integExportDocumentLog.ClassName == exportClass
        {
            if (! exportRecordList)
            {
                exportRecordList = new DEVIntegExportRecordList();
            }
            exportRecordList.addExportLog(integExportDocumentLog.recId);
        }
        if (exportRecordList)
        {
            DEVIntegExportDocumentsLog::exportRecordList(exportRecordList);
        }
    }

}
Comparing Custom Export Class vs. Standard Business Events
While Microsoft provides a seemingly similar concept with Business events for Dynamics 365 Finance and Operations, there are significant differences when compared to our custom Export class approach. Let's examine these differences in detail:
1. Data Creation Timing
With Business events, data is captured at the moment the event occurs, creating a fixed event payload. In contrast, Export class gathers data at the time of export execution. This allows for real-time data retrieval, including any updates made after the initial trigger. For example, an export may fail due to incorrect or missing mapping. For External integration, you just need to fix this mapping; it will be automatically applied at the time of the next export.
2. Event Frequency and Uniqueness
Business events are generated for each occurrence, potentially creating multiple events for the same document (e.g., two events for two confirmations of the same purchase order). There's also no guaranteed sequence for event delivery. For documents that can't be modified after the export(e.g. Invoices), this difference is probably not critical, but in case exporting documents that can be modified, you need to make sure that the consuming side can handle the message sequence correctly.
Export class, however, maintains a unique Export log entry per document, updating existing entries for repeat actions on the same document. This ensures the most recent state is always exported.
3. Response Processing
Business events are generally designed for one-way communication with limited built-in capabilities for processing responses from external systems. Our Export class easily incorporates logic to handle responses, allowing for updating local records based on the external system's response (e.g., linking local PO with external PO number).
4.No logs
Business events do not support any logs, except for internal send errors. For example, if the event was sent successfully, you won't see this. You also can't find out for the original document - what types of events were sent to it. This is a common integration question, for example, if the external team tells you they don't receive an event, you have no options to validate it when using Business events. External integration has a complete log, and it contains the Original document and the Reference RecId to the original record, so troubleshooting is quite simple; you can always see what events were generated and sent.
Setting Up and Validating Integration
Let's walk through the process of setting up and validating our integration solution.
Configuring Connection Types
First, we need to set up the connection to our web service. Navigate to the External integration – Connection types.
It requires the hostname(will be https://purchaseorderapp20240916.azurewebsites.net/api/purchaseorder) and allows to set a user/password credentials to access this host(in our example, we're leaving these empty)
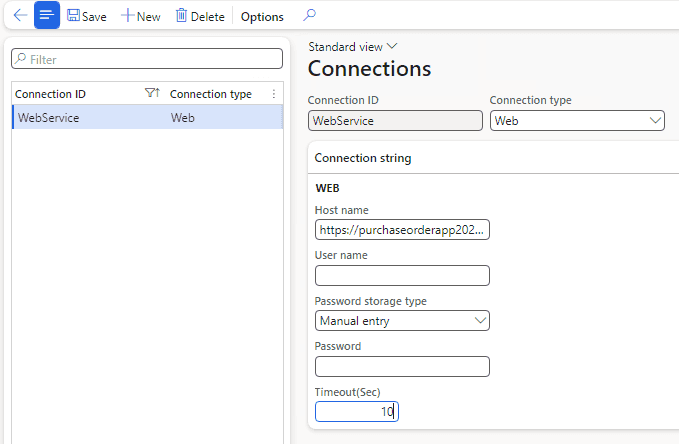
The system offers several options for storing passwords:
- Manual entry: An unencrypted string, suitable for development. It will persist even after database restores.
- Encrypted: A secure option that encrypts the password value.
- Azure Key Vault: Links to the standard D365FO key vault for the most secure password storage.
Defining Outbound Message Types
Next, we'll configure the parameters for our data export in the Outbound message types form.
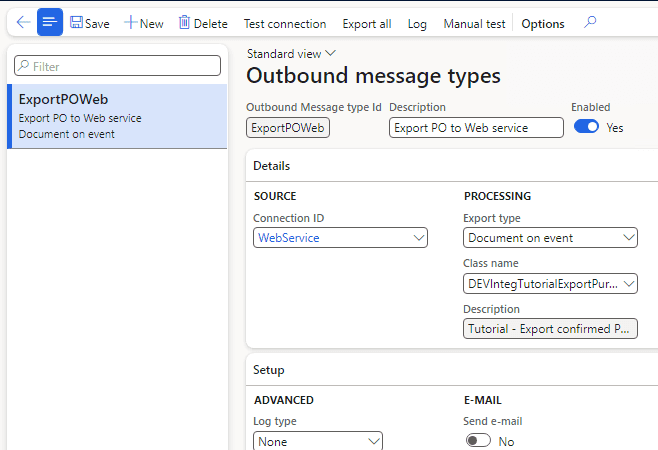
Key settings:
- Set "Export type" to "Document on event"
- Select our custom export class
- Specify the connection ID we just created
Setting Up Integration Parameters
For our integration, we also created the following parameters
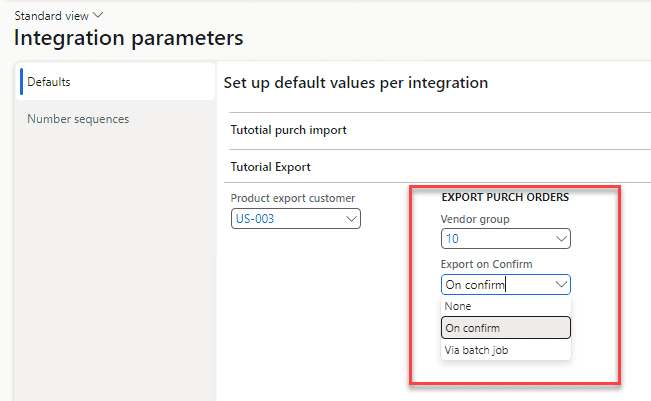
For our specific integration, we've created some additional parameters. You can find these in the integration parameters form:
- Vendor Group: This defines the filter for exported Purchase Orders.
- Export on confirmation option: This determines when the actual export (web service call) happens:
- In the user session immediately after confirmation
- Via a periodic batch job
Export scenarios
Initial Export of the Data
Some Purchase Orders (POs) may already exist in the database when setting up the integration. To export these, use the "Export all" button on the "Outbound message types" form. You'll see a standard query dialog like this:
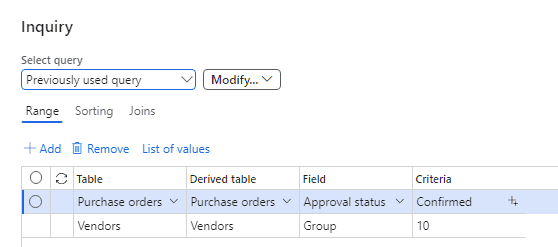
After running the query, all Purchase Orders matching your criteria will be processed. The system will add a record with the PO reference to the Export document log table, setting its status to To send.
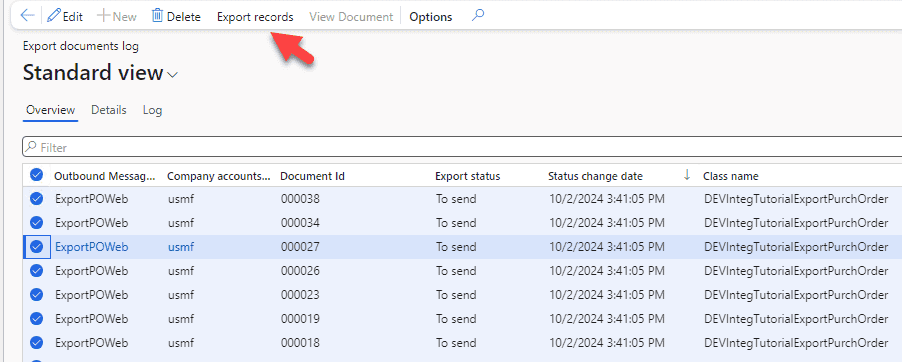
Periodic Batch Export
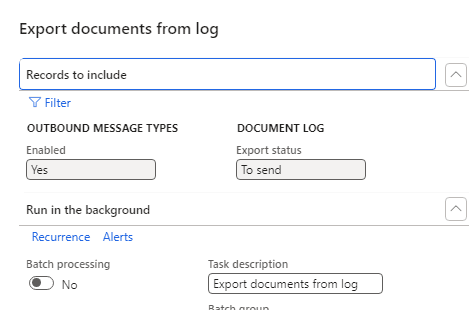
The Export messages from log periodic operation in D365FO process all records in the Export document log table with a Status = To send. You can also manually export by selecting records and using the Export records button:
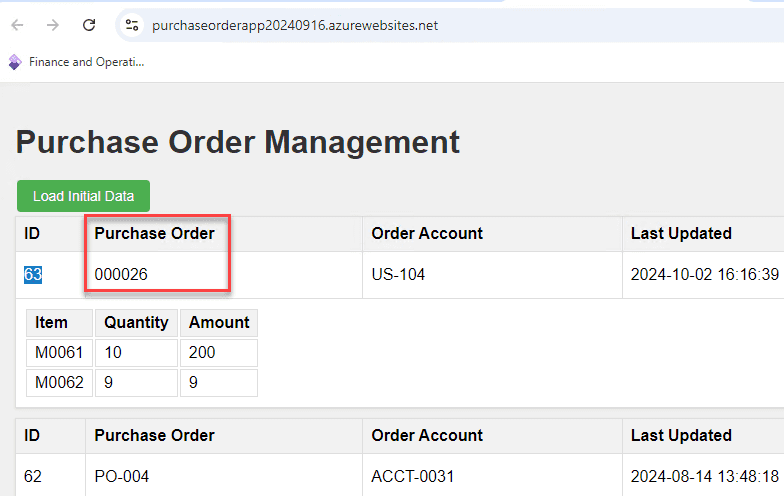
After processing, you should see the exported orders on our site:
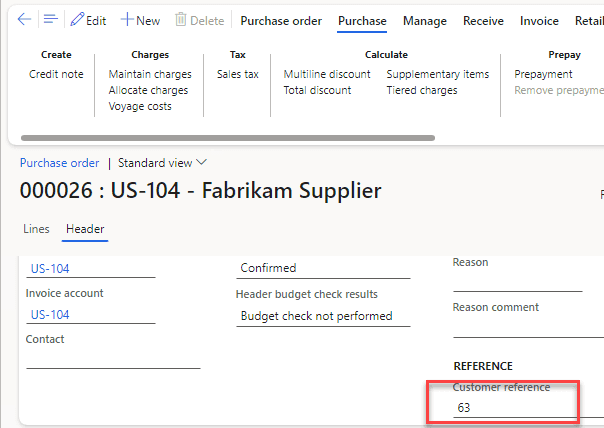
The Reference field will be populated for exported orders in D365FO:
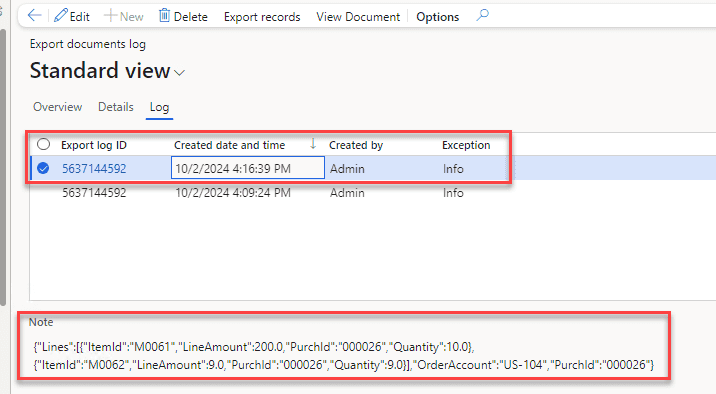
If you've enabled full logging, you can check the exact message sent in the Export document log form:
After a successful export, the Export Status field for the Export document log table will change to Sent:

Export from the User Session
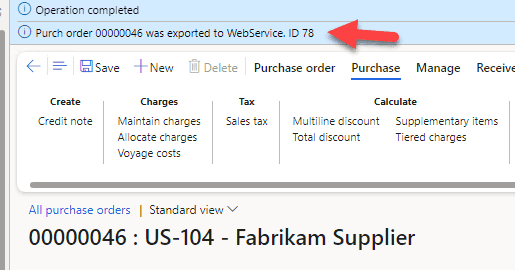
When a user runs a Purchase order confirmation, if any Export document log records were created during this process, the system runs the export immediately after the main operation. The status will be displayed to the user.
If an error occurs during the export, it will be displayed to the user, but the Confirmation process will not be affected. This allows for real-time feedback while ensuring the main business process isn't disrupted.
Handling Export Errors
If an exception occurs during the export, the Export document log record will remain in the To send status. An additional log will be generated with the workload details and exception text.
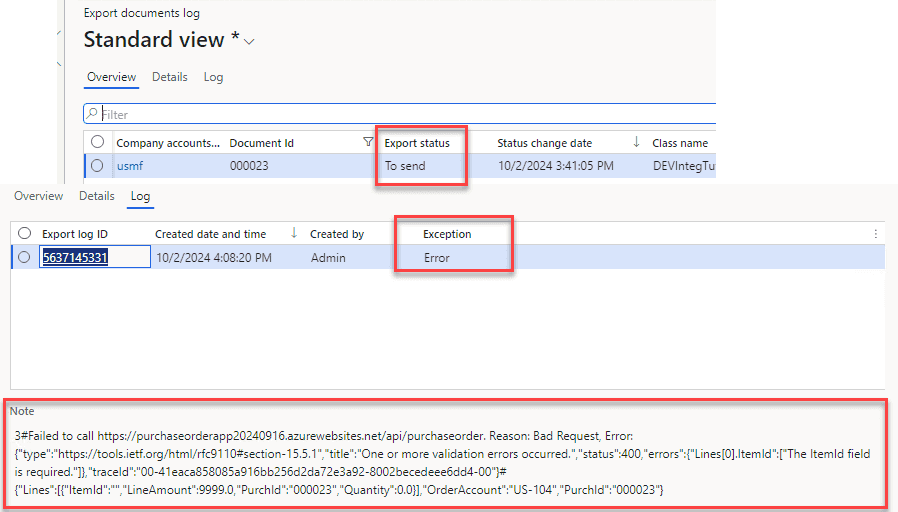
For example, if a Purchase order contains a service Item (without ItemId), but our test web service doesn't accept such data, you'll see an error logged.
It's important to note that the Export document log has only two statuses (To send and Sent); there's no specific Error status. From a business perspective, it doesn't matter whether the record wasn't exported or if the export failed. The key is that the record needs attention. For effective monitoring, set up your alerting system to flag records that stay in the To send status longer than your defined threshold.
Troubleshooting and Monitoring
Integration can be complex, and proper tracing to identify issues is vital for the whole process. Let's explore the different options that the External integration framework provides for troubleshooting and monitoring:
Tracing the call
One of the most common issues with service calls is when the Web service doesn't process the call properly but returns a success code. For example, when we send an update to an existing PO, the update might fail for some reason, but no error code is returned. This results in mismatched data between the systems.
To trace this error, we need to use the external PO ID to find an export record using Document ID and see the full history of exports.
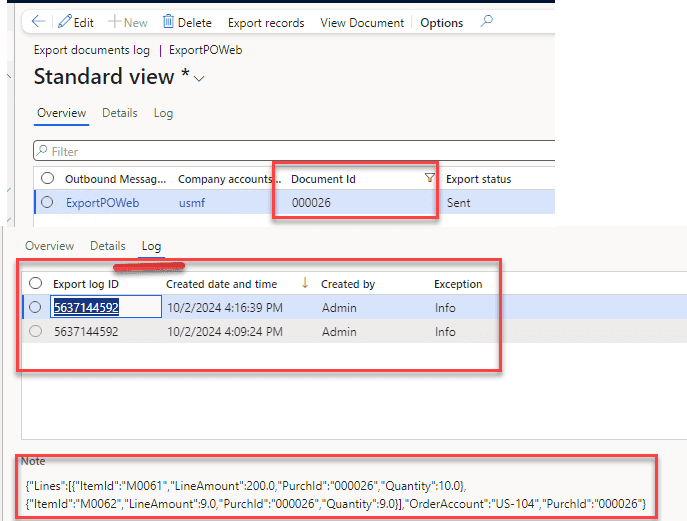
Using this information, we can determine on which side the error occurred and take steps to fix it.
Manual Test Form
Another useful tool for troubleshooting is the Manual test form. This form offers several options:
"Init from document" button
This button allows you to:
- Select a Purchase order number ignoring existing validations.
- See how this document will be represented in the data.
- Display the workload without actually sending it
"Call Create" button
- Take input data (which can be previously generated by the "Init from document" button and then modified by the user)
- Perform a call with this data.
- Display the results
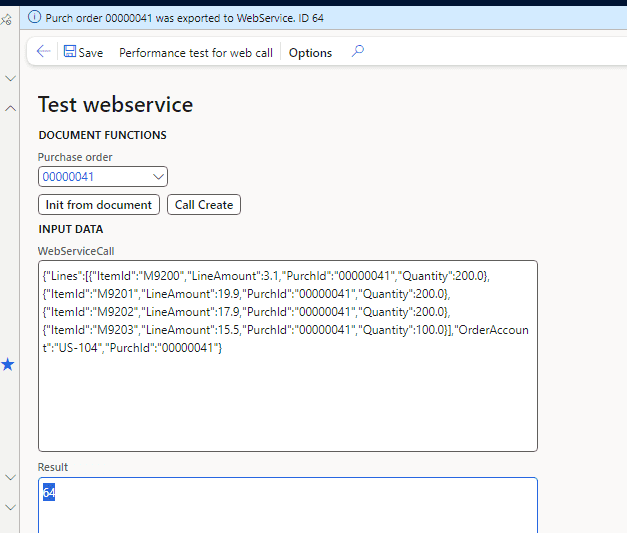
The advantage of this approach is that it allows you to test the webservice without using any external tools like Postman. This can be very helpful in troubleshooting scenarios.
Monitoring
Monitoring can be done using External Integration workspace that displays statistics for a given period and number of not exported records.
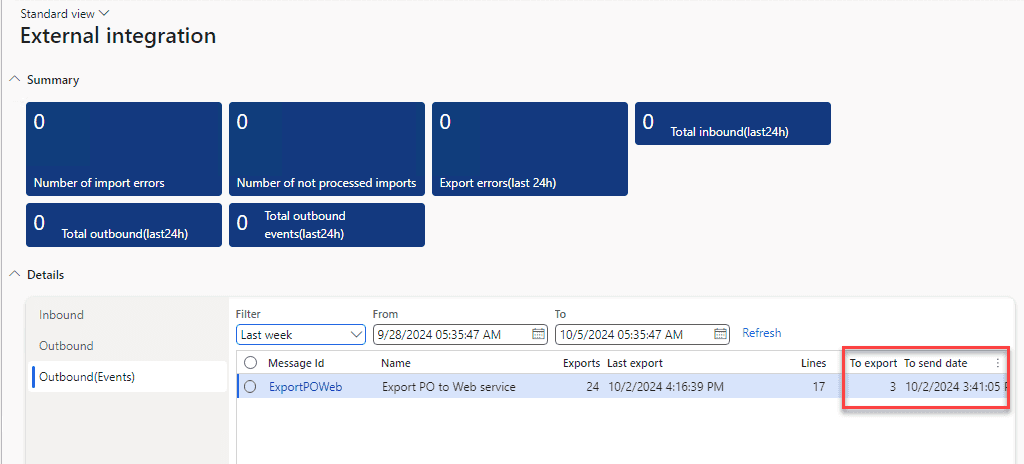
This dashboard gives you a quick overview of your integration's health and performance, allowing you to spot issues early and take action.
Performance testing
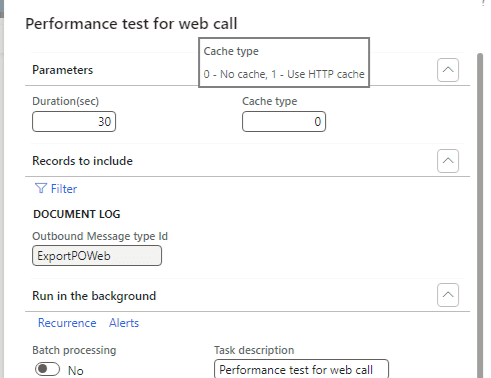
The External integration framework provides a simple performance test operation to assess the speed of our integration. Let's explore how this works and what insights we can gain from it.
How It Works
The performance testing process involves several steps:
-
First, you need to create a set of documents that are ready for export. These will serve as your test data.
-
Next, run the Performance test operation. This operation allows you to:
- Specify a standard query filter for the Export document log table (this means you can create multiple clients if needed)
- Run processing of these records in a loop for a specified period (set by the Duration parameter)
-
The test can be run in two modes:
- Reusing the same connections to export documents
- Creating a new connection (instance of HttpClient class) for every export line
Here's what the Performance test operation form looks like:
For our webservice, I ran the performance test for 60 seconds and got the following results:
- When creating a new connection for every line: 350 exports/minute
- When reusing the same connection (cached): 700 exports/minute
These results highlight an important point: creating a new connection is a complex operation. It can be even more time-consuming if authentication is involved.
Resources for This Blog Post
All resources used in this blog are available on GitHub. Let's take a look at what's included and how you can use these resources for your own integration projects.
To implement your own D365FO integration with a webservice, you'll need to create two main classes:
-
A class similar to DEVIntegTutorialExportPurchLoad
- This class handles the interaction with the custom Webservice(if we use Azure service bus or File share, it is not needed)
-
A class similar to DEVIntegTutorialExportPurchOrder
- This class defines the export document structure.
Additionally, you should create a form for manual testing of these classes, similar to DEVIntegTutorialTestWebCall.
Once these components are in place, the External integration framework will handle all other aspects of the integration process.
Sample Web App
For testing purposes, I've set up a sample web app. At the time of publishing this post, it is deployed at the following address: https://purchaseorderapp20240916.azurewebsites.net/
The source code for this test web service is also available on [GitHub] (https://github.com/TrudAX/TestWebService_PurchaseOrderApp)
Summary
In this post, I have described how to implement event-based exports from Dynamics 365 Finance and Operations to Web Service using the External Integration framework. We discussed the following key topics:
- How to design such integration
- Sample implementations of how to call a web service and how to create a document class
- How to monitor typical issues with such integration
- How to perform performance testing
I hope you find this information useful. As always, if you see any improvements or suggestions or have questions about this work, don't hesitate to contact me.
Tagged with:
Written by Denis Trunin
Similar posts:
- XppInteg - Import purchase orders from XML files into D365FO
- XppInteg - Azure Service Bus integration solution for Dynamics 365 FinOps
- D365FO Integration: Import Purchase Orders from PDF using Gemini AI
- D365FO Performance. Periodic import of one million ledger journal lines
- Create ledger journals in D365FO using X++
- D365FO upgrade. Transfer attachments from AX2012